
Introduction
Where do I begin? I am still looking for the perfect 3D printer for a ‘New-To-The Hobby’ kind of person, although the Geeetech E180 was very close. Something that comes fully built, easy to use, easy to maintain, and finally with open avenues of support.
The Aladdinbox Skycube doesn’t check all of those boxes. There are some features on the Skycube that I find really intriguing, but should you buy it?
Full disclaimer, I was sent this Aladdinbox Skycube from Gearbest to do this review. Sothanks to Gearbest for giving me the opportunity to try this out!

First, when it’s on sale for the low-low price of $178 USD, what are you really getting? Let’s go
through the features!
- 110x110x110 build area
- .4mm nozzle
- Cantilever style printer
- non-heated bed
- no parts cooling fan
- built-in spool holder for mini spools
- Mostly-fully built
- removable magnetic bed
What’s in the box?
The printer was well packaged, with a large piece of Styrofoam on the bottom and the top. This helps sandwich the printer in the box and keeps it from moving around. The gantry was held in place with some tape and two 3D printed clips on the Z rails. There was some damage to my box during shipping, but the printer came out perfectly fine!
The Aladdinbox Skycube came with the normal assortment of tools, a micro-SD card, a USB reader for the micro-SD card, a mini spool of filament, the manual, USB cable, a glue stick, the magnetic print bed, and a power brick. This was probably the best in terms of filament that I have ever received in a printer purchase, besides some bundle that includes a free roll.
The tool selection was on point, but the Micro-SD USB reader was a god send! It was nice to be able to use that instead of putting in an SD adaptor and then using my laptop to access the files off the SD.
The Aladdinbox Skycube comes mostly assembled, all you have to do is remove packing material, pop in the Bowden feed tube, load the filament, insert the micro-SD card, level print surface and start printing. No tools required. The filament spool holder drops from the side, and fits the included mini spool perfectly.
Well Built?
The good thing about the Aladdinbox Skycube is that it’s all a single unit. The spool holder is built into the side, and the external PSU is just a laptop brick that hides nicely from view. There’s very little to adjust in the chassis, the only real adjustment is the Z end stop. Everything else is snapped in place.
The body is made out of injection molded plastics with NO 3D printed parts. All axis operate on smooth guide rods with linear bearings. The Z axis is a single M8 lead screw drive directly off the motor. All motors appear to be the standard NEMA 17 type.
The Y carriage is semi-permanently affixed to the guide rods and would require a disassembly of the entire printer chassis to service. Same for the X axis, the Z axis is a bit more serviceable, allowing access to the lead screw from removing the Z axis motor from the underside of the printer.
The control knob, display and the micro SD slot are all on the upper right front edge of the printer. This makes it easy to swap the card out and access the controls.
The power and USB connections are to the right of the display just above the extruder. Everything is easy to reach and not really in the way. It would be better if the power and USB were on the rear of the machine, but that’s just me being picky.
Using the Aladdinbox Skycube
After plugging it in you will be greeted with a simple menu. This is a bare bones printer with little in the way of options and no room for upgrades. It runs a bare bones Repetier firmware with only a few options…
- Print From SD
- Auto-Stripper
- Heating print head
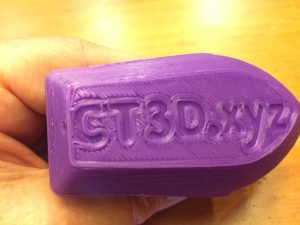
‘Print from SD’ allows you to print or delete files off of the included SD card. There are a bunch of fun files on the SD card to try!
‘Auto-Stripper’ is to swap filament, it will walk you through the option of heating the print head and then backing the filament out. Unhelpful name, but solid process.
‘Heating print head’ heats the print head to 230c. The manual for the Skycube states that this is to help remove jams. Heat the hot end way up and then force filament in and out manually. In my testing of this printer, I never had a jam.
Levelling the bed?
Not very level..
You will notice right away that there is no assisted bed levelling like what I am used to in a ‘noob-centric’ build. The only want to ‘level’ the bed is to adjust a single Z end stop, which is a large thumb screw under the Z axis end stop switch.
The manual states that you adjust this end stop screw to level the bed. Here’s a quick run-down of the levelling process:
- Make an adjustment with the thumb screw
- Manually lower the Z axis down by twisting the lead screw
- Test with paper near the centre of the bed, note the change that needs to be made
- Manually raise Z axis by twisting lead screw high enough to fit your hand in
- Adjust screw
- Repeat process until you feel confident
I hope you got angry reading that, because it’s a frustrating process. This is only accentuated by the fact that you can not make adjustments to the bed corners. If you have a low spot, like I did, shim the plate and use a raft. This is 2018 people! Say NO to rafts!!!
Let’s get 3D Printing!

After leveling the bed, insert the SD card and get printing! My Aladdinbox Skycube, fresh out of the box, sounded like someone ripping wood with a table saw on every axis.
It was so loud that the wife forbid me from using it during the evening hours. Every one of the motors was hot to the touch.
None of them ever failed in my testing. From the sounds of it, there was definitely something wrong with the VREF on the stepper drivers.
Print quality was surprisingly good. With all of the racket this thing was making I expected it to just look terrible. Much to my amazement, it made good prints! The only issue I had was caused by bed adhesion.
This was due to the fact that my build surface/Y carriage was so warped that I had nearly. 5mm worth of differentiation across it’s surface diagonally.
It’s also worth noting that even though the Aladdinbox Skycube doesn’t have a dedicated part’s cooling fan, it manages to do a fairly decent job at cooling because of the duct work from the hot-end that directs the air down towards the print on three sides. Even though the fan is small 30mm 12v fan, it performs admirably.
The extruder on this printer is another solid design. It has a very protected filament path that allows this printer to also utilize flexible filaments that don’t require a heated bed.
 So now, let’s hammer out the positives and negatives..
Should You Buy the Aladdinbox Skycube?
Well, this printer is another good idea on paper, and manages to fall short on expectations.
Here’s what I like about the Aladdinbox Skycube:
- small
- cheap
- good print quality
- non-heated, removable magnetic build surface
- serviceable manual with plenty of full colour pictures
Here’s what I didn’t like:
- Locked firmware
- warped print surface or bent X/Y rail
- Limited GUI
- the noisiest printer on planet earth
- seriously, folks.. the NOISIEST printer in the world!
- no dedicated part’s cooling fan
- Support?
Support?
I didn’t talk about it until now because I was saving it for last. I am fairly certain that this company, Shenzhen Longer 3D Technology Co, has either gone under or dissolved.
I’ve contacted their HR department to let them know I was writing this article, contacted their support for some assistance, and it’s been MONTHS without a reply. I have created a Facebook group for owners of this printer to get support from other users. 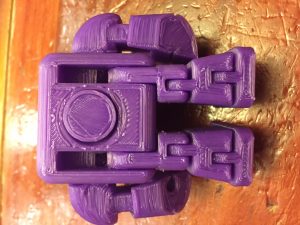
This printer was also sold under other names besides the Aladdinbox Skycube. So if you stumble across this page and you own this 3D printer and wish it was better.. stay tuned for the next article where I walk you through turning this half baked attempt of a 3D printer into a venerable POWER HOUSE!
Do You Own the Skycube?
If you are wondering about a slicer profile, I am going to hold off on that for this article. If you own this printer, I really encourage you to read the followup article to really get it functioning properly. I had good luck using the default settings for the MonoPrice Maker Select Mini V1 in Cura 3.2.1. Just be sure to edit the bed size in the printer settings to suit the 110x110x110 of the Aladdinbox Skycube.
Ending Words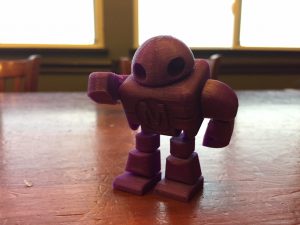

If I didn’t know much about 3D printing and I spent under $200 USD on the Aladdinbox Skycube, would I be happy? Probably not. I would be disappointed in the lack of options and pondering if I should return this small blue box to GearBest for store credit towards an Ender 2/3.
The Ender isn’t as slick looking as this printer and the Ender doesn’t have a magnetic build plate that you can easily pop off.
I want to reiterate that out of the box, this printer was pretty terrible sounding. The crippled GUI and levelling process(lol) will also be off putting to some. I like that this printer is mostly self contained, save for the small PSU, and looks good on a desktop.
Once you get it dialed in.. you will be blown away by the print quality! Only you can decide if this is worth your time!
Like the review? Share it on Facebook or send me a donation on Paypal! Check out my last review of the awesome Geeetech E180!
[Best_Wordpress_Gallery id=”91″ gal_title=”Aladdinbox Skycube”]
Can you provide the software and driver zip that came with this printer?
Mine came only with sd card full of gcode files, nothing else.
The printer is always detetcted via USB as unknown USB2.0 device.
Thanks!
I looked at the chips at the mainboard, and now found drivers for the CH340G USB connection chip for windows.