
Table of Contents
Are you fed up of manually leveling your print bed? Why not invest in a GmFive 3D Touch v3.0 auto bed levelling probe! A BLTouch clone? Read on to learn more and with help on how to set this up.
Packaging
The GmFive 3D Touch v3.0 came in an oversized shipping box, and contained within, wrapped up in bubble wrap was a small plastic case that contained all the components. That was it. No paperwork or instructions, so you will need to do your research online; however, hopefully, I can help you here.

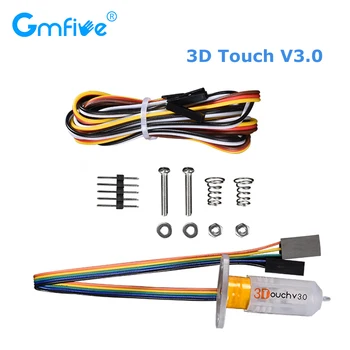
You get the following within the small case.
- 3D Touch V3.0 probe
- 80 cm extension cables
- Screws, nuts, washers and springs
Installation
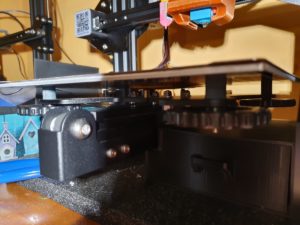
The physical install of the 3D Touch is pretty straightforward. Please bear in mind, that I am using an SKR v1.3 board for this install on my Ender 3, however, this should be compatible with most 3D printer boards. Also, you will need to print a mount for the 3D Touch, of which many can be found on Thingiverse. I am using the Hero Me fan duct on my Ender 3.

The wiring is simple too…although the extension cable colours may not match the colours from the actual 3D Touch, as long as you know which one is connected to which, you won’t have any issues. You should be able to match one of the colours up at least to make it easier.
Once connected up, I used heat-shrink on the connectors to ensure they stay connected and then secured this to the main cable running from the extruder to the board using some wire wrap.
Wiring
The extension wire is as follows…
- Black – Signal wire
- White – Ground wire
- Yellow – Voltage wire
- Red – Ground wire
- Brown – Signal wire
I had Blue and Black wires from the probe which matched up with the Black and White on the extension cables. Also, Yellow, Orange and Green from the probe which matched up with Yellow, Red and Brown on the extension cable.
These plug into the Z- endstop pins and the Servo pins on the SKR v1.3 board as labelled below. It may be worth securing these in either using glue or putting plugs on them to avoid then slipping out.

For the Servo pins, the wires go in this order from left to right – Yellow (V), Red (G), Brown (S)
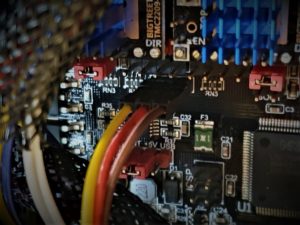
For the Z endstop, the top wire is White (G) and the bottom Black (S)

Ensure you remove your physical endstop from the printer as this will no longer be needed.
Installation is now complete!

Firmware setup
For ease of installation, I used Teaching Techs Marlin config file, which included the BLTouch installation. This is a free download of which you can get from here. The only thing I had to change was my stepper driver config to use TMC2209’s and also to invert some of my stepper motors, so be sure to check all of those before continuing.
Besides, you will also need to measure the distance between the probe and your nozzle. Depending on your placement of the probe, you measure how far left or right of the nozzle the probe is and also how now in front or behind. This is then updated within the firmware as per the below screenshot.

The next step
Now we have installed everything, once you power on the printer, the GmFive 3D Touch v3.0 lights up in red and the probe will click up and down a couple of times to initiate. If you find it is not doing anything but lights up, check your wiring and you may need to swap the wires around plugged into the Z endstop port. However, if nothing at all, check all the wiring!
The next thing is to set up your Z offset. I found a fantastic Youtube video courtesy of 3DMN, which helped tremendously! Ensure you have Pronterface installed. You can check out the video below.
If you wanted, you could remove the springs from your print bed, and in their place, you can use silicone bed mounts. As you now have the GmFive 3D Touch v3.0, you can set your gcode to auto level your bed before each print, thus giving you the perfect first layer!
I printed some in Tougher resin by iFun 3D for this purpose as they can withstand temperatures of up to 95°c – And so far, so good!
Auto bed levelling
Now that everything is installed and in place, we are now ready to use our GmFive 3D Touch v3.0! For it to function, add this within your start gcode after the G28 command. (This is my current setup, but there are many variations of this for ABL)
G29 ;ABL
When you start a print, the print head will move to the centre of the bed and check the measurement a couple of times. It will then proceed and measure 9 points on your bed, starting with the front left and finish at the back right. This measures each section on your bed and accommodates for any inaccuracies for you to get that perfect first layer. It will then start printing as normal.
Where to buy?
You can purchase the GmFive 3D Touch v3.0 via AliExpress for a high price of just £9.09! (plus P&P) *Price correct as of 24/10/19. For more help and guidance, you can also join the GmFive Facebook group
Price Comparison And Alternatives
| | $33.60 | Buy Now |
 Amazon.com Amazon.com | $37.98 6 new from $37.98 1 used from $32.99 | Buy Now |
| Amazon.com | out of stock | Buy Now |
| Amazon.co.uk | out of stock | Buy Now |
| Amazon.co.uk | out of stock | Buy Now |
| | $15.99 out of stock | Buy Now |
Conclusion
To sum up, I feel this is an excellent addition to my 3D printer as it saves me having to level the bed manually. It’s an automated process, so all I have to do it load the filament and press print…the rest is all automated. This also gives me the confidence to not have to ensure the first layer goes down.
The GmFive 3D Touch v3.0 seems well built, as expected so should last. Also, if it was to fail, all I’d need to do it swap the probe as the rest is already in place. The price point for this is also excellent especially being a BLTouch clone. Just a couple of pints it will cost for you to ensure you have good first layers! It certainly looks the part too on my printer.
Feature picture attribution
Thank you for reading, and if you have any questions or comments, please feel free to leave them below.
Want more upgrades for your 3D printer? Check out E3D Hermes Extruder – The latest and greatest? or how about Creality Ender 3 Upgrades And Mods – Must Have (Pro)