
Table of Contents
When I first heard about Luban, I was skeptical. Not because of what it could do, but because of the purpose, it would serve. Luban was designed to split large print jobs into smaller sized chunks that make it easy to make GIANT prints on a typical (200mm x 200mm) print bed,
I typically only print functional devices and things. At times, I will mess around with 3DBenchies and other fun things to test a printer, but I didn’t get into 3D printing for printing models.
This article will be the first in a series describing my trials, testing, and using Luban to create print jobs. I will go over some of the standard application settings, using the application and printing Luban jobs over a variety of printers.
What is Luban?
Like I had mentioned earlier, Luban is an application for breaking apart an STL file into ‘chunks’ that you can print easily on any printer. You can define the size of the chunks for each axis, attachment method, and error correction. Most people would look at this as an opportunity to print GINORMOUS things on their CR10 style printers. I am going to go in a different direction with my first Luban print. Let’s try and write some regular sized CR10 prints on a mini printer!
Not only does LuBan cut your print into smaller chunks, but it also adds alignment elements into your models to make assembly a breeze!
But Why Use a Mini Printer?
First of all, I typically try and stray away from mainstream thought. Most importantly, though, wouldn’t it be more fun to do something different? Lots of people have started to get into 3D printing lately. There are tons of people out there with smaller print beds that have been longing to make giant figurines and other crazy things. Luban will be the key to open that door.
Getting LuBan
Alright, I want to get this out of the way now. Luban is NOT a free program. The beautiful thing about Luban is that you can download it freely and see how it works without actually paying for it. I was given a free six-month license to try this application out for these articles. As of this date, you get a FREE one month trial. If you want to purchase Luban, it is $20USD for a one year license and an additional $10 for each year past that(up to 5 years). A lifetime license will set you back $120USD. If you are a student, they offer a free six-month license.
Head to Luban and click ‘Download‘ in the middle of the screen. This will redirect you to a Dropbox page where you can select the correct download for your operating system. After downloading the program, extract the zip file, and open it up!
To activate your copy of Luban when installed, choose your license option. With Luban open, go to ‘Help‘ from the menu wrong and select ‘About‘. You will need to copy the entirety of the License ID into the web form from the link above. Make sure to include the brackets {} and operating system type from the License ID as well.
It’s time to get ready to make some print job chunks!
Using LuBan
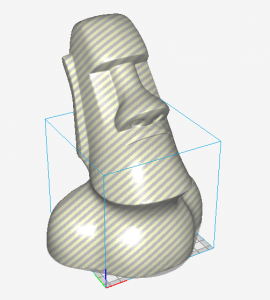
To start, I chose this Moai model from Thingiverse as my first Luban creation. Of course, I decided to print the large one. When selecting a model to 3D print, make sure that the model is reliable. I have noticed some strange things happen when dealing with hollow models.
 After opening your model, go to the ‘Mesh‘ menu in the menu bar of the application and then choose ‘Luban’. Select your unit of measurement, which should be millimetres. This will open a new window with a few options.
Under the ‘Input‘ section, you can resize your model. Changing one of the axis values adjusts the other three to keep the shape uniform to the original and keep it from skewing.
Let’s Output some Chunks!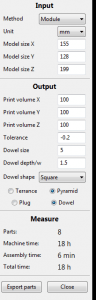


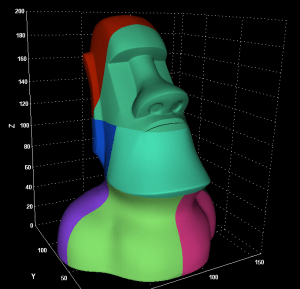
The ‘Output‘ section is where the magic happens! This is where you set the program to configure the printable chunks. To set this up for the Aladdin box Skycube, I set the X, Y and Z to all be 100mm. This cut the Moai head into eight chunks. You can also adjust and configure your alignment elements. There are many different options, but I chose to use pyramid style plugs. You can also improve the tolerance of the alignment elements. I decided -0.2, which gives you a slightly larger hole and smaller dowel.
When you are done, choose ‘Export Parts‘, select a folder and Luban will dump your model chunks and a whole bunch of other things into a folder named after the STL that you exported.
 Now What?
The files that you will need to print will be in the ‘filename_Print‘ folder. They will all be labelled Part_xx.STL in numerical order. If you chose to use dowels as your alignment method, the STL file for that would be there as well. I decided to hold off on printing any dowels until I could get the other pieces printed and see how many I needed.
I inspected all of the model files before printing to make sure there wasn’t any external fragmentation. All the data for the Moai figure came out great. I found some interesting issues with a hollow item, so be sure to check your data after exporting from Luban.
Get Printing!
Now’s the time for printing! Pop all these files into your slicer of choice and get them to your printer. A favourite slicer of many of the Inov3D team is Simplify3D, but I am a CURA fan. If you have an Aladdin box Skycube, you can get my CURA slicer profile from Github. Otherwise, use whatever profile you usually would for your filament of choice and align them to get the best quality of prints on your build plate.

Once you print all of the pieces that are needed, next, will come the time for assembly! This is where I will end this instalment of my Luban article series for now. Next month I will document how I assemble and finish the Moai head.
I had a lot of fun printing these. Having a small printer, like the Aladdin box Skycube, really limits what you can print. There are other ways to slice objects into pieces for chunk printing, but I haven’t found any that are as easy to use as Luban. I appreciate it’s powerful simplicity. It is a pricey piece of software. Depending on how often you will use it, though, it could prove to be a valuable asset.
Be sure to check out the HE3D Ultra Big K280 Delta Printer – Problems
Guess you decided not to bother with the followup?
sorry andrew is not with the team any more