
Brozzl before Nozzle….
Brozzl is not a name I had heard of before I went looking for an all metal hotend upgrade for my CR10s Pro.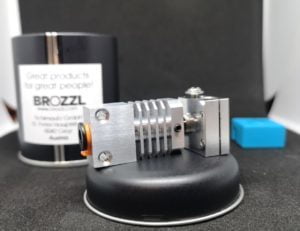
The requirement for an upgraded hotend came around due to the desire to print and test ASA, Nylon and ABS filament. This is something the standard PTFE lined hot end from Creality isn’t suited. This is because at higher temperatures 200C and above it begins to break down. This can have some unpleasant side effects, especially in birds, so if you have a budgie where you print be warned!
For more information about this check out this safety guide on PTFE from Capricorn
Swiss Cheese?
A quick google and it was apparent my two options were either E3D V6 hot end or the Microswiss. I am discounting the obvious “cheaper” alternatives available from Aliexpress and other similar retailers. But wait! What’s this in the corner of my eye on the google page, Brozzl All Metal Hotends.
Brozzl
A quick browse around Brozzl’s website left me in no doubt that I needed to try this new supplier. Reading their site, it contains little information about the company itself however it was newly founded in 2019 by a group of “absolute tech nerds” from Austria, and they are striving to bring another quality hot end and nozzle option to the market place.
 Firing off a cheeky email asking if they would be interested in allowing me to provide an honest and unbiased review of their Brozzl All Metal Hotends, I waited…My wait was a short one as merely 4 hours later I had a reply! Not only were they happy to help but they were sending me a full hotend kit for both my CR10s Pro and Ender 3 Pro to ensure I could provide a full review. These were supplied by the UK Agent from Brozzl All Metal Hotends – 3dJake. Uk who also sent me this cool sticker! Who doesn’t love a label!
Nozzle
Brozzl also makes precision nozzles in brass, plated copper, hardened steel and a ruby tipped one. These guys are not messing about. Microswiss watch out these guys are gunning for you!
Business
Arriving the next day I was delighted with the packing. It was a small, sturdy box lined with bubble wrap. Within, it contained two cool looking tins, each labeled with its appropriate hotend kit snugly and safely inside.
Upgrade
Installation was a breeze. Lifting the gantry before disconnecting the mains – Safety first people! Using my trusty hex screwdriver I  removed the fan guard and fan, snipping the Bowden tube using my tube cutter just above the fitting had this disconnected in a jiffy.
A little tip; Always cut Bowden tube with a filament inside it. This helps to keep it from deforming. That out of the way I released the grub screws holding the thermistor and heater cartridge. All that remained was to unscrew the remains of the hot end from the carriage.
Install
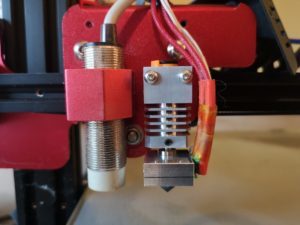 Fitting the Brozzl All Metal Hotends is essentially the reverse of stripdown. I bolted the new heat sink to the carriage, nipped the throat and nozzle up in the heat block – not too tight as we will be tightening the nozzle later once it is hot! Installing the thermistor and heater cartridge are very similar to removal.
Ensure that the thermistor bulb is firmly secured but not pinched. If it comes, lose you risk thermal runaway as the firmware will not know the hot end temp and continue to pump power into the heater until it catches fire.
Fortunately, most firmware should have thermal runaway protection enabled – if you’re unsure you can check by following this guide from Michael at Teaching Tech. The heater cartridge on the Brozzl All Metal Hotends are secured by two grub screws. Be sure not to overtighten them! The throat and heart block is then secured into the hot end via a grub screw that sits in a machined recess in the throat, so you know you’re seated correctly in the heat sink.
Once installed, heat the hotend to 240C and allow a couple of minutes for the temp to stabilise and soak the hot end. Shut off the power than holding the heat block with some channel locks or a 22mm spanner avoiding the wiring! Tighten the nozzle a nip. Be careful not to burn yourself! Once this is done, turn your machine on and set it to cool down.
Once cool, install the silicon sock, and you’re done! Don’t forget to reset the height of your level sensor if fitted and relevel your bed to take into account the changed hotend height. Regardless of how close it is, it will never be the same position as your old hotend.
Tuning
As with any significant change to your setup it will need tuning in, and a hotend change is no different. Firstly, before you reconnect the Bowden tube, I would carry out an Estep check to ensure your extruder is running sweet. Secondly, after that, perform a PID tune.
This ensures your hot end is heating correctly and reading correctly. You can do this in Marlin by connecting your machine to your pc if it has a boot loader installed – I use Pronteface, but you can use any slicer that allows you to input commands. I won’t go into the procedure here, but there are lots of useful videos on Youtube from Teaching Tech, Makers Muse and Matterhackers, to name a few.
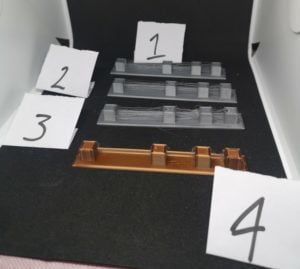 Initially, I wasn’t impressed. No matter what I did with my retraction settings, I could not get a clean stringing test. Test after analysis looked like a crazy spider had been having fun at my expense! My retraction was changed from 2mm to 5mm in 0.25mm steps, and I printed no end of heat towers.
I adjusted my temps from 200 to 220C without success. Then I stumbled onto a video from Angus at Makers Muse where he had a similar issue, and it turned out to be the filament! Could it be that simple? Swapping the silver Polysmart filament for copper silk from Tianse, I reprinted on my best settings so far. A clear test! So that just shows it pays to try different filament if you’re struggling to get good results.
The silver Polysmart was a newish roll, less than a week old and had previously printed with excellent results, so I had no reason to suspect the filament.
Ender 3 Pro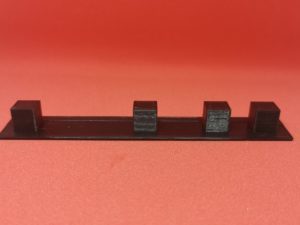

I fitted the second of my Brozzl All Metal Hotends to the Ender 3 Pro. I did the same as above minus resetting the level probe as I don’t have one fitted yet. Combined with the SKR 1.3 and 2208 steppers in my Ender 3 Pro, this is a silent flawless printing machine. 3mm of retraction and on the first test it’s perfect! Every print off it since has been excellent and no stringing at all.
Once I get my enclosure sorted, I will test some high temp filaments and expand on this review, but up to this point, I am over the moon with the quality of the product and the prints it is producing.
Final Thoughts
Brozzl has done well to engineer an excellent quality product that’s well thought out and works precisely as you want it to. If I had any criticism, it would be the lack of thermal paste for the threads. In addition to this, no printed guide or link to an online guide for the lesser experienced users, but that’s it and all things considered, that’s picky on my part. Both my hotends came with hardened steel nozzles, silicone socks and Bowden tube clips. You have everything you need to get going!
Once again, thanks to Brozzl and 3DJake.uk for providing the test units.
Are you enjoying this article? Hungry for more? try our review of the Creality CR10S Pro and the Microswiss upgrade for the Ender 3

I purchased the Brozzl CR-10S Pro All Metal Hotend. Fitting it required the addition of M3 nuts to place the nozzle on the axis of the sensor and to allow for the length of the original fixing screws. I also put a little heatsink compound in the thermistor pocket.